How to Sharpen Kitchen Knives at Home: A Contractor's Guide to Getting a Real Edge
A licensed GC's hands-on method for sharpening kitchen knives at home — honing vs. sharpening, the whetstone technique that actually works, finding and holding the right angle, feeling for the burr, and which tool to reach for based on how dull your knife really is.
Updated
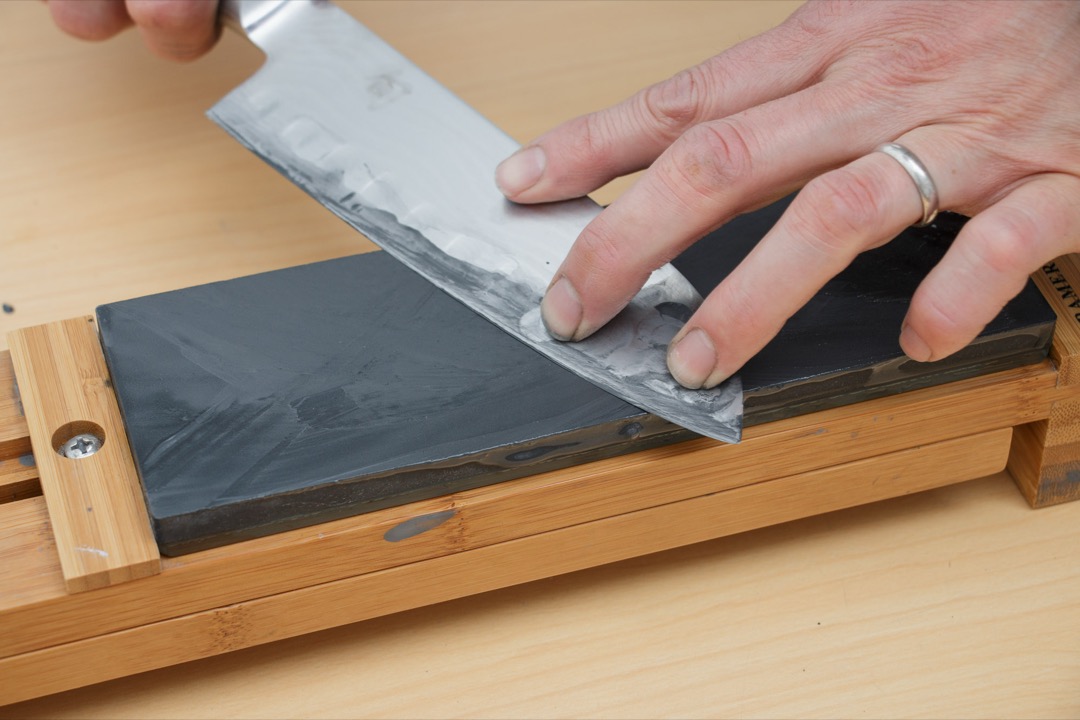
There is a moment every home cook eventually has: you are trying to slice a ripe tomato, the blade skates across the skin instead of biting in, and you press harder until the tomato squashes. That is not a bad knife. That is a dull knife — and almost every dull kitchen knife can be brought back to a genuine, paper-slicing edge at home, in a few minutes, with a tool that costs less than a couple of takeout meals.
I am a licensed general contractor, not a chef, but sharpening is sharpening. I spend my working life keeping edges true — chisels that have to pare end grain cleanly, plane irons, utility blades that stop working the instant they go dull — and a kitchen knife runs on exactly the same physics as any other blade in my shop. The angle, the burr, the difference between removing metal and simply realigning an edge: it is all the same skill. Once you understand what is actually happening at the edge, sharpening stops being mysterious and becomes a quick, satisfying bit of maintenance. This guide walks through the whole thing — how to tell a knife is dull, the difference nobody explains between honing and sharpening, every method ranked by what it is actually good for, and the technique details that separate a razor edge from a rubbed-up mess.
First, understand what “dull” actually means
A knife edge is a thin wedge of steel ground down to an apex only a few microns wide. When people say a knife is dull, they usually mean one of two very different things, and they need opposite fixes.
The first is a rolled edge. With normal cutting, that microscopically thin apex folds over to one side — it is still there, still sharp, it just no longer meets the food straight on. This happens constantly, within days of sharpening, and it is completely normal. A rolled edge does not need sharpening. It needs honing, which straightens the apex back to center in seconds.
The second is a worn edge. Over weeks and months, the apex actually abrades away — the wedge gets rounded and blunt, and there is no longer a fine edge to realign. This is a genuinely dull knife, and honing will not fix it. You have to remove metal and cut a fresh apex, which is what sharpening means.
Almost everyone conflates these two, which is why so many people believe their knives “won’t hold an edge.” They are honing a worn-out edge and wondering why it does not help, or they are ignoring a rolled edge until it becomes a worn one. Knowing which problem you have is the whole game. The quick diagnostic is the paper test: hold a sheet of printer paper by its top edge and try to slice down through it. A sharp knife bites in and cuts a clean ribbon. A knife that only needs honing will cut poorly but improve dramatically after a few passes on a rod. A truly worn knife tears the paper no matter how much you hone — that one needs a stone.
Honing vs. sharpening: the distinction that changes everything
Let me make this concrete, because it is the single most useful thing in this article.
Honing removes no metal. A honing rod — the steel rod that comes in nearly every knife block and that most people never touch — realigns the rolled edge. You should hone often, every few uses, as ongoing maintenance. It takes fifteen seconds and it is why a well-maintained knife feels sharp for months.
Sharpening removes metal. A stone, a pull-through, or an electric sharpener grinds away steel to form a brand-new apex. You only need to do it a few times a year for a home cook. It is the occasional real work, not the daily upkeep.
The pattern that keeps a knife sharp is: hone frequently, sharpen occasionally. People who only ever sharpen (and never hone) let their edges roll and dull between infrequent grinding sessions. People who only ever hone eventually run out of edge to realign and get frustrated. Do both, at the right intervals, and even a mid-range knife stays genuinely sharp for years. If you are shopping for a knife that will actually reward this care, our roundup of the best kitchen knives covers which blades hold an edge and which are built from steel that dulls the week you get it home — and if you are outfitting a kitchen from scratch, the best kitchen knife sets guide flags which sets include a real honing rod versus a decorative one.
The honing rod: your most-used tool
Start here, because this is the tool you should reach for most often and the one that does the most to keep sharpening sessions rare.
Stand the rod vertically with its tip planted on a folded towel on the counter — this is safer and easier to control than the theatrical mid-air swiping you see chefs do on TV. Set the heel of the blade near the top of the rod at roughly the knife’s edge angle (about 15–20 degrees; picture the blade a hair off vertical). Draw the blade down and toward you in one smooth arc so the entire edge, heel to tip, sweeps across the rod. Alternate sides — left, right, left, right — for five or six light passes each. Use light pressure; you are nudging a folded edge back into line, not grinding.
That is the entire technique. Do it every few uses and you will be astonished how long a properly-sharpened knife stays sharp. When the day comes that honing no longer brings the edge back — the paper test still fails after a good honing — that is your unambiguous signal the edge has worn and it is time for a stone.
The whetstone: the method that actually sharpens best
If you learn one sharpening skill for life, make it the whetstone. It removes metal in a controlled, precise way; it works on any knife regardless of brand, steel, or original angle; it produces a keener and longer-lasting edge than any pull-through or electric machine; and a single stone lasts for years, making it the cheapest method over its life. The only cost is a modest learning curve — two or three knives of practice — and then it clicks and never leaves you.
What to get: a combination water stone with a coarse side around 400 grit (for re-establishing a worn or damaged edge) and a fine side around 1000 grit (for refining it to sharp). That single stone handles nearly every home sharpening need.
The setup matters more than people think. Soak the stone in water until the air bubbles stop rising, then set it on something that will not move — the classic mistake is a stone skating across a wet countertop mid-stroke. A damp towel under it works; a stable bench or sturdy workbench is even better if you have one, because a rock-solid surface lets you focus on the blade instead of chasing the stone. Good overhead light is not optional either — you need to see the edge and the water on the stone clearly, and a decent LED shop light over your sharpening spot makes the difference between watching what you are doing and guessing.
The stroke: hold the blade at your target angle (20 degrees per side for Western knives, about 15 for Japanese — more on angle below) and push the edge across the stone edge-first, as if you were trying to shave a thin layer off the stone’s surface. Keep the whole edge in contact from heel to tip; on the curved belly toward the tip you will need to lift the handle slightly to keep that part of the edge on the stone. Do the same number of strokes on each side. Coarse side first until you have re-formed the edge (you will confirm this by feeling for the burr — see below), then flip to the fine side to refine and polish it.
Finding and holding the angle
Angle is where most beginners freeze up, so let me demystify it. For most Western kitchen knives — German brands and the majority of chef’s knives sold in the US — 20 degrees per side is the forgiving, durable standard. Japanese knives are ground thinner, usually 15 degrees per side or less, which is why they arrive frighteningly sharp and also why they chip if abused. If you do not know what your knife is, use 20 degrees; a slightly wider angle is more robust and still plenty sharp for home cooking.
The number matters far less than consistency. A knife sharpened at a slightly-wrong but perfectly consistent angle will out-cut one sharpened at the “correct” angle that wandered five degrees every stroke. Two tricks make it repeatable. First, a visual reference: lay the blade flat on the stone, then lift the spine to about the height of two stacked coins for ~15 degrees, or a bit higher (roughly a fingertip laid flat) for ~20. Second, if freehand feels hopeless at first, buy a small clip-on angle guide that snaps onto the spine and holds the angle for you — there is no shame in it, and it teaches your hand what the correct angle feels like so you can eventually drop it.
Feel for the burr — it’s how you know it’s working
Here is the concept that separates people who can genuinely sharpen from people who just rub steel on a rock: the burr.
As you grind one side of the edge, you are pushing metal to the opposite side, where it forms a tiny wire-thin ridge running the length of the blade. When you can feel that burr along the entire edge — check by carefully dragging a fingertip away from the edge, never along it, on the side opposite the one you have been working — that side is done. It means you have ground all the way to the apex. If there is no burr, you have not reached the apex yet, and the knife will not get sharp no matter how long you keep grinding.
So the sequence is: grind one side until a burr forms along the whole edge, flip the knife and grind the other side until the burr forms on the first side, then alternate progressively lighter strokes (and move to the fine grit) to reduce and remove that burr, leaving a clean apex. Feeling for the burr is the feedback loop. It is the difference between knowing the sharpening is working and merely hoping it is.
Pull-through and electric sharpeners: fast, fine for cheap knives
These tools trade edge quality for speed and zero skill. A pull-through drags the blade between fixed carbide and ceramic wheels at a preset angle; an electric sharpener does the same with motorized wheels. Both will revive a badly dull inexpensive knife in seconds, which is genuinely useful. But both remove more metal than any other method, impose their own fixed angle regardless of your knife’s grind, and leave a rougher, shorter-lived edge than a stone.
My rule splits by knife value. For cheap everyday knives you are not precious about, a decent pull-through or electric unit is a perfectly reasonable fast tool — the edge is more than good enough. For a good chef’s knife or a Japanese blade, skip them entirely and use a stone; you will get a keener, longer-lasting edge and you will not feed an expensive knife into carbide wheels that do not care about its geometry. If you own a range of knives, keep a pull-through for the beaters and a stone for the good stuff.
In a pinch: emergency sharpening without a stone
Sometimes you are cooking, the knife is dull, and there is no stone in the house. Two improvised methods will get you a working edge for the evening — neither is a substitute for real sharpening, but both are better than fighting a dull blade.
The ceramic mug hack is the good one. Flip a coffee mug over and look at the unglazed ring of rough ceramic on the bottom — that raw ceramic is abrasive enough to act as a crude sharpening stone. Hold the mug steady, set the blade against the rough ring at roughly your 20-degree angle, and draw the edge across it edge-first, the same motion as a whetstone, alternating sides for a couple dozen light strokes. It leaves gray metal marks on the ceramic (that is steel coming off) and produces a rough but genuinely functional edge. The sandpaper method works too: lay a sheet of wet-dry sandpaper (medium grit, then fine) on a flat surface like a book or a cutting board and sharpen against it exactly as you would a stone. Both are field fixes — think of them the way I think of using the flat of a file when the sharpening stone is back at the shop. They get you through the job; they do not replace doing it right later.
Special cases: serrated and ceramic knives
Two kinds of knife do not play by the rules above.
Serrated knives — bread knives, most steak knives — sharpen very differently, because the cutting work is done by the individual pointed teeth, not a continuous edge. You cannot run a serrated blade across a flat stone without ruining the serrations. Instead, each scallop (the curved groove between teeth) is honed individually with a tapered round sharpening rod sized to fit the groove, working only the beveled side. Honestly, serrated knives dull slowly and most home cooks are better off honing them occasionally with a tapered rod and replacing them when they finally wear out, rather than trying to fully restore them.
Ceramic knives are the opposite problem: the material is extremely hard and extremely brittle, and it needs a diamond sharpener to abrade at all. A steel honing rod does nothing, and a normal stone will not touch it. Because ceramic chips rather than rolls, a damaged ceramic edge often cannot be saved at home. My advice on ceramic knives is simple — if one goes dull or chips, send it to the manufacturer’s sharpening service or a pro with diamond equipment, and do not attempt it freehand.
A note on safety
The counterintuitive truth every tradesperson knows: sharp tools are safer than dull ones. A dull knife requires force, and force is what makes a blade slip off a carrot and into your hand. Most kitchen knife injuries happen with dull blades, not sharp ones. That said, sharpening itself puts your fingers near a live edge, so a few habits are worth building. Keep the hand not holding the knife well clear of the edge’s path. When you check for the burr, drag your finger away from the edge, never along it. If you are learning on a coarse stone and your hands are wet and slippery, a pair of cut-resistant gloves — the same work gloves I keep in the shop for handling sheet metal and glass — take the stakes out of a slip while you build muscle memory. And always sharpen on a stable surface so nothing shifts mid-stroke.
How often, and when to call a pro
For a home cook using knives daily, a full sharpening two to four times a year is realistic, with honing in between. The interval depends on how much you cook, what you cut on (cut on wood or quality plastic — never glass, stone, or ceramic boards, which dull and chip edges shockingly fast), and whether you hone regularly. Let the paper test be your guide: when your daily knife fails it even after honing, it is time to sharpen. As a rough cadence for a knife in regular use:
| Task | How often | What it does |
|---|---|---|
| Hone (steel rod) | Every few uses | Realigns the rolled edge — takes seconds |
| Sharpen (whetstone) | Every 2–4 months | Removes metal, cuts a fresh edge |
| Deep sharpen / repair | As needed (chips, heavy wear) | Coarse-grit regrind or a pro |
| Professional service | Every 6–12 months (optional) | A tune-up if you would rather not DIY |
Adjust up if you cook constantly or cut on hard surfaces, and down if the knife mostly sits in a block.
Doing it yourself with a whetstone is cheaper and, once practiced, every bit as good as a professional service for mid-range knives. But there are three times I send people to a pro: a high-value or specialty knife you would hate to damage while learning; a badly chipped or mangled edge that needs heavy regrinding; or the honest case where you know you simply will not practice — a knife a pro keeps sharp beats a drawer of dull blades you never touch. Setting up a whole kitchen and a workshop at once? Our guide to the essential tools every new homeowner needs covers where a sharpening setup fits alongside the rest of the basics worth owning from day one.
The bottom line
Sharpening a kitchen knife at home is not a specialist’s art — it is a fifteen-minute skill built on three ideas: hone often to realign the edge, sharpen occasionally on a stone to remove metal and cut a new one, and feel for the burr so you know the work is actually happening. Get those right, protect the edge with a decent cutting board and sane storage, and a good knife will stay genuinely sharp for years. The tomato will slice instead of squash, and you will wonder why you ever cooked any other way.
Frequently Asked Questions
What's the difference between honing and sharpening — aren't they the same thing?
What angle should I sharpen my kitchen knives at?
Are pull-through knife sharpeners bad for your knives?
How often do kitchen knives actually need sharpening?
Is it worth paying for professional knife sharpening instead of doing it myself?
Related Articles
About the Reviewer

Jake Morrison, Licensed General Contractor
B.S. Construction Management, Purdue University
Jake Morrison has spent 14 years in residential construction and home renovation before founding DIYRated in 2026. After helping hundreds of homeowners choose the right tools and materials for their projects, he started writing the product guides he wished existed when he was starting out. Jake tests every major product recommendation in his workshop in Indianapolis and focuses on real-world performance over spec-sheet marketing.