How to Winterize Your Home: A Contractor's Complete Checklist
A licensed GC's field-tested winterization checklist — climate zone timing, failure-cost framing, DIY-vs-pro decisions, and the high-ROI gaps competitors miss.
Updated
October is the month I get the most calls from homeowners who waited too long. Late October in Minnesota means the first hard freeze hit on a Tuesday night, and by Wednesday morning a hose left attached to an outdoor spigot has burst the pipe behind the siding, and water has been pouring into the wall cavity for twelve hours before anyone noticed. By the time I get there, the homeowner is staring at a $30,000 remediation job that a ninety-second hose disconnection in September would have prevented entirely. This pattern repeats every winter, in every cold-weather state, with depressing regularity.
This guide is the actual checklist I hand to clients in early fall — the same checklist I work through on my own house. It is not a sanitized list of forty bullet points. It is a contractor’s prioritized framework: what to do, when to do it, where to spend money versus where to save, what is genuinely DIY versus what to hand to a pro, and which winterization tasks competitor articles consistently ignore (crawl spaces, attic air sealing, ice dam root cause). If you follow this end to end, your house will run quieter, cheaper, and safer through the cold months — and the March callbacks I get from people who skipped it will not include yours.
When to Start: Climate Zone Timing
The first decision is timing, and timing is climate-dependent. Using the calendar to drive your winterization schedule is how you end up with a burst pipe in late October because you assumed November was soon enough.
Here is the timing framework I use, anchored to USDA hardiness zones because they correlate well with first-hard-freeze dates:
Zones 3-5 (northern tier — Minnesota, North Dakota, upstate New York, northern New England, Wyoming, Montana, eastern Washington): All exterior tasks complete by October 15. Hard freezes can hit in the last week of October without warning. Schedule HVAC tune-ups in September because the pros book solid by mid-October. Outdoor hose disconnection, sprinkler blowout, and gutter cleaning should be done by October 1 if at all possible. Snow removal equipment serviced and ready by Halloween.
Zones 6-7 (mid-Atlantic, Ohio Valley, Tennessee Valley, Pacific Northwest west of the Cascades, lower Great Lakes, central New England): Exterior tasks complete by November 1. You typically have a buffer of two to three weeks before a reliable hard freeze, but the first frost shows up in mid-October most years and serves as your warning shot. HVAC tune-up in September or early October. Hose disconnection by mid-October. Sprinkler blowout by the third week of October.
Zones 8-9 (Carolinas south, most of Texas, Arizona deserts, California Central Valley, Florida north of Orlando): The framework changes entirely. Hard freezes are episodic — a polar vortex pushes south, you get one or two nights below 25°F, and then it is back to mild. Winterization here is contingency planning, not seasonal lockout. Have your hose disconnection routine, faucet drip protocol, and pipe insulation supplies ready by November 15, then deploy them on the specific nights when forecasts call for it. The bigger annual concerns in these zones are HVAC heat-pump efficiency prep, attic insulation (which is undersized in most southern homes built before 2010), and making sure your one-or-two cold snaps per year do not catch you unprepared.
Zone 10+ (south Florida, southern California coast, Hawaii): Honestly, you are not really winterizing. Inspect HVAC, check weather stripping, and move on with your life.
The pattern most homeowners follow — “I’ll do my winterization the weekend before Thanksgiving” — works in Zone 7 and is too late in Zone 4. Match your timeline to your zone. Set a calendar reminder for the appropriate trigger date and treat it like a closing-day deadline.
Exterior: Gutters, Roof, Outdoor Plumbing
The exterior tasks have the highest failure-cost ratio of any category — the work itself is fast and cheap, and the consequences of skipping it are severe.
Disconnect and drain every outdoor hose. This is the single most important task on the list. Detach every hose from every spigot, drain it by walking the length and lifting one end at a time, coil it, and store it indoors (a garage, basement, or shed all work — just out of sustained freezing temperatures). Even if you have frost-free spigots, leaving a hose attached defeats the frost-free design because trapped water in the spigot pipe cannot drain back into the warm side of the wall. The pipe ruptures behind the siding, and you do not find out until spring when you turn on the spigot and water pours out of a finished wall.
Shut off non-frost-free spigots at the interior valve. If your house was built before about 1995, your outdoor spigots are probably the older non-frost-free style. There will be an interior shutoff valve on the supply line — usually accessible from a basement, crawl space, or utility room — that lets you isolate the exterior spigot. Shut that valve off, then walk outside and open the spigot fully to let any remaining water drain out. Leave the spigot open all winter so any residual moisture has somewhere to expand.
Drain and shut down sprinkler systems. This is the task most homeowners get wrong. The right approach is to shut off the irrigation supply line at the main valve (usually inside a utility room or basement), then blow out the system with compressed air at 30-40 PSI — and not higher, because higher pressure damages sprinkler heads, valves, and PVC fittings. Most homeowners do not own a compressor capable of the volume needed (about 80-100 CFM for a typical residential system), which is why this is the one outdoor task I almost always recommend a pro for. Cost is typically $75-$200, and it is cheap insurance against a cracked manifold or burst lateral lines come spring.
Clean the gutters — properly, not the half-job version. A clogged gutter in winter holds standing water, which freezes and forces snowmelt to back up under your shingles. That is the mechanism behind ice dams and leaks. The proper gutter cleanout is to scoop out leaves, debris, and accumulated grit by hand (with gloves), then run a hose at full volume through every downspout to confirm flow. Any downspout that backs up needs to be snaked or disassembled at the elbow joint. This is also the moment to check for loose hangers, sagging sections, and rusted seams — fix them now or budget for replacement gutters. While you are dealing with fall leaf cleanup, our best cordless leaf blowers roundup covers the homeowner-grade options that handle both yard cleanup and gutter debris.
Inspect the roof from the ground. Walk the perimeter with binoculars. Look for missing shingles, lifted shingle edges, exposed nail heads, cracked flashing around chimneys and vents, and any sagging in the roof plane. A roof that is going to fail in winter usually telegraphs the weakness in fall. If you see anything questionable, get a roofer out before snow load arrives — repair work in October costs a fraction of emergency leak callouts in February.
Trim back tree limbs hanging over the roof or power lines. Heavy snow and ice loads break weak limbs, and the ones aimed at your house or service drop are the ones that cause expensive damage. A single ice-loaded limb through the roof costs $5,000-$25,000 to repair plus interior water damage. Pruning costs nothing if you have a saw and an extension ladder, or $200-$500 if you hire it out.
Drain the garden hose bib feeding any outbuildings. Detached garages, sheds, and pool houses on shared water lines are common burst-pipe sites because they are out of sight and out of mind. Walk every outbuilding and confirm the supply has been isolated and drained.
Skipping this section costs: Burst pipe behind siding ($5,000-$70,000), cracked sprinkler manifold ($300-$1,200), ice dam from clogged gutters ($1,000-$10,000), failed roof leak from unrepaired flashing ($3,000-$30,000).
Plumbing: Protect Pipes Before First Freeze
Pipes inside the heated envelope of the house are mostly fine. The pipes that fail are the ones that run through cold zones — exterior walls, vented crawl spaces, garages, attic runs (yes, this is more common than people think), and the line feeding the outdoor spigot.
Identify your vulnerable lines. Walk your house with a notepad. Any plumbing visible in the basement that disappears into an exterior wall, runs through a garage, or enters a crawl space — flag it. Any pipe in a kitchen cabinet on an exterior wall is a freeze candidate (open the cabinet doors during cold snaps to let house air reach the pipes). Any line running through an unconditioned attic is a major risk and should be re-routed inside the heated envelope or wrapped in heat trace cable on a thermostat.
Insulate the vulnerable lines. Foam pipe sleeves (the ones that look like split black foam tubes) are sold at every hardware store for under $5 per six-foot length. Size to your pipe diameter, slit if necessary, and wrap. For lines that have a long history of freezing, foam alone will not cut it — add heat trace cable with an inline thermostat that energizes the cable when pipe surface temperature drops below 38°F. Cable cost is $30-$60 per length plus a dedicated outlet; total install runs $100-$300 if a homeowner does it themselves on accessible runs, or $300-$800 for a plumber on harder routing.
Crawl space coverage — the gap nobody covers. If you have a vented crawl space with plumbing running through it, the foundation vents need to be closed in winter and the plumbing needs supplemental protection. Most homeowners do not realize their crawl space vents are still open from summer; closing them is a simple matter of sliding the louvered covers shut or installing foam vent blocks (5-10 minutes per vent). The plumbing in the crawl space should be insulated regardless. For chronically cold crawl spaces, a small thermostatically-controlled heater (shop-floor style, drum-can style, or a dedicated crawl space unit) drawing 500-1500 watts on a thermostat keeps the space above 40°F all winter for $30-$80 in monthly electricity. This is one of the biggest gaps I see in standard winterization checklists — competitors do not cover it because they do not crawl through crawl spaces, and it is the failure point I see most often in older single-family homes.
Locate and confirm your main water shutoff works. This was the move-in checklist item, but if you have not operated your main water valve in twelve months, do it now. Older gate valves seize from non-use. If yours does not turn smoothly, schedule a plumber to replace it with a modern ball valve before you need it in an emergency. A working shutoff is the difference between a $200 leak repair and a $30,000 flood.
Stock the emergency supplies. A foam pipe sleeve in every outdoor-wall accessible cabinet, a roll of heat tape, and the phone number of an after-hours plumber written somewhere you will find it at 2 AM during a cold snap. The mistake homeowners make is figuring out their plumber-on-call situation during the actual emergency.
Skipping this section costs: Single burst pipe ($5,000-$70,000 depending on what got wet), repeated freeze events on the same chronically-vulnerable line (cumulative repair history that sells houses for less when disclosed).
HVAC: Heating System Prep
Your heating system runs harder and longer in winter than it does any other season, and it needs to be ready before the first sustained cold spell — not during it.
Schedule a professional HVAC tune-up by mid-October at the latest. This is the line-item I tell homeowners not to DIY. A licensed HVAC tech checks the burner, inspects the heat exchanger for cracks (a cracked heat exchanger leaks carbon monoxide into the home — this is not theoretical, it is a $1,500-$3,000 repair if caught and a hospital trip if missed), tests gas pressure, cleans the burner, lubricates the blower motor, checks combustion analysis, and verifies the safety controls. Cost is $150-$300 and it pays for itself in efficiency improvement and disaster avoidance. Schedule it in September if you can — the calendar fills up fast in October.
Replace the furnace filter and stockpile spares. A clogged filter restricts airflow, makes the furnace run hotter, increases utility bills, and shortens equipment life. Replace it the week before heating season starts and check it monthly through winter. Buy six filters at once — cheaper per unit and you will not skip a change because you are out. While you are thinking about indoor air, our best air purifiers for the home roundup covers the units worth running through winter when houses are sealed up tight.
Test the heating system before you need it. Fire it up in early October when the weather is still mild. Run it for an hour. Listen for unusual sounds, watch for smells (a brief dust-burning smell on first ignition is normal; persistent burning smells, gas smells, or rubber smells are not), and confirm every register has airflow and every room reaches the set temperature. The goal is to discover problems on a warm October day when an HVAC company can come out tomorrow, not on the first 10°F night when every HVAC company in town is running a three-day backlog.
Reverse ceiling fans to clockwise (low speed). Looking up, the blades should rotate clockwise in winter, which pushes warm air down from the ceiling instead of pulling cool air up. The reverse switch is on the fan motor housing. Free, takes thirty seconds, makes a measurable difference in rooms with vaulted or two-story ceilings.
Calibrate or replace the thermostat. If your thermostat is over ten years old and not programmable or smart, replace it with a smart thermostat (Nest, Ecobee, or similar). The savings on heating bills typically pay for the unit within a single winter. Set heating schedules: lower temperatures during sleep and away periods, normal temperatures during morning and evening occupied periods.
Service backup heat sources. If you have a wood stove or fireplace insert, this is when you sweep the chimney and inspect the appliance gaskets. If you have a backup propane or natural gas wall heater, test it. If you have electric baseboards, verify they all function — a single bad heater in a remote bedroom is a frozen-pipe risk in that bedroom.
Test for carbon monoxide leak risks. Beyond the HVAC tune-up, walk to every CO detector in the house, press the test button, and replace batteries if applicable. Replace any detector older than seven years (sensors degrade). Add CO detectors near every gas appliance and on every floor including the basement if you do not have full coverage.
Skipping this section costs: Cracked heat exchanger missed and venting CO ($50,000+ medical risk plus equipment replacement), furnace failure during cold snap ($1,500-$5,000 emergency repair plus $200-$500/night for hotel and any frozen pipes that result), inefficiency from neglected service (10-20% higher heating bills all winter).
Building Envelope: Stop Heat Loss
This is the highest-ROI section for long-term cost reduction and the section homeowners chronically underinvest in. Air sealing and insulation are invisible, unsexy, and the largest single lever you have on heating bills, comfort, and ice dam prevention.
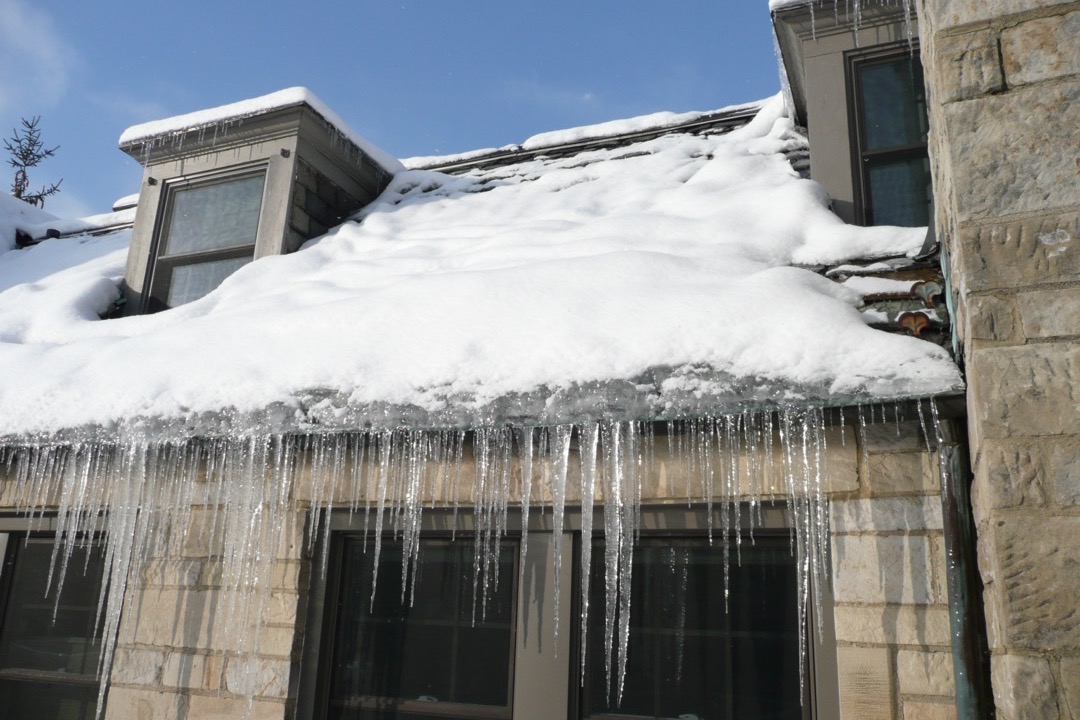
Air seal the attic — and yes, this is different from insulating the attic. Most homeowners who think they have done attic work have only added insulation. Insulation slows heat conduction through a layer; air sealing stops heat leakage through gaps. Your attic floor has dozens to hundreds of air leakage points: around plumbing penetrations, around electrical box top plates, around recessed lights, around bath fans, around chimney chases, around the attic hatch itself. Warm air from the house pours up through these gaps all winter, taking heating dollars with it, and crucially — this is the warm air that melts roof snow from below and creates ice dams.
The right protocol is to air seal first, then insulate over the sealed surface. Use canned spray foam for small gaps (under one inch), backer rod plus foam for larger gaps, fire-rated caulk around flue chases, and a sealed and weatherstripped attic hatch. Once the air sealing is done, top up insulation to R-49 minimum in northern zones (Zones 4-7), R-38 in moderate zones (Zone 6-7), or R-30 in southern zones (Zones 8-9). Most pre-2000 homes have R-19 to R-30, which is undersized for current code. Adding cellulose blow-in over existing insulation is a one-day DIY job with rented equipment, or a one-day pro job at $1.50-$3.50 per square foot installed.
The ice dam root cause — and the permanent fix. Ice dams form when heat from the house leaks into the attic, warms the underside of the roof deck, melts snow on the upper roof, and then that meltwater refreezes when it hits the cold eave overhang (which is not warmed from below because the eave is outside the heated envelope). The ice ridge that forms at the eave dams further meltwater behind it, which then backs up under the shingles and leaks into the house. Heat tape cables along the eaves are a band-aid that masks the symptom — they melt channels through the ice dam but do nothing about the heat loss causing it. The permanent fix is air seal the attic floor and add insulation, which keeps the roof deck cold and prevents the snow from melting in the first place. If you have repeated ice dam problems, the solution is upstream of the roof, not on it.
Weather strip every door. Walk to every exterior door, close it, and run a hand around the perimeter looking for air movement. Replace any compressed, cracked, or missing weather stripping. The bottom door sweep is the most commonly failed component — replace with a new sweep ($15-$30) rather than trying to bend the old one back to shape. For double doors, the astragal (the strip that covers the gap between the two doors) needs its own seal.
Caulk and seal exterior penetrations. Every place a wire, pipe, or vent passes through the exterior of the house is a potential air leak and water entry point. Walk the perimeter and inspect: dryer vents, bath fan exterior caps, electrical service entrance, hose bib penetrations, AC line set entries, gas service line. Re-caulk anywhere the existing caulk is cracked, separated, or missing. Use a quality polyurethane or high-grade siliconized acrylic — not the bargain caulk that fails in two years.
Window inspection and storm windows. Single-pane windows are the largest single heat loss point in a house. If full window replacement is not in the budget, install interior storm window kits or shrink-film on the worst rooms. Inspect every window for compressed or missing weather stripping in the sash mechanism, broken seals on insulated glass units (visible as fog or moisture between panes — these need replacement), and missing screen tracks letting air bypass the sash.
Crawl space encapsulation — the other invisible upgrade. Vented crawl spaces lose enormous amounts of heat through the floor above. The two right answers are either (1) seal the foundation vents, install a vapor barrier on the crawl space floor, insulate the foundation walls with rigid foam, and effectively make the crawl space part of the conditioned envelope — this is the encapsulation approach, runs $3,000-$8,000 from a pro and pays back in five to ten years on heating bills, or (2) heavily insulate the floor above the crawl space (R-30 minimum) and seal every penetration through the floor, which is cheaper at $1,500-$4,000 but less effective. The wrong answer is leaving a vented uninsulated crawl space alone, which is what 80% of homes have and what costs them an extra $300-$800 per winter in heating bills.
Skipping this section costs: Higher heating bills every winter forever (typically 15-30% higher than they need to be), recurring ice dam damage ($1,000-$10,000 per event), uncomfortable rooms that family members never use, and the slow rot of unsealed building penetrations that becomes structural repair work in fifteen years.
Fireplace and Chimney
If you have a wood-burning fireplace, wood stove, or fireplace insert, the chimney is a fire risk that gets worse every burn season. This category gets handled in fall, before the first burn.
Schedule a chimney sweep and inspection — annually, not occasionally. Creosote (the flammable residue from wood smoke) accumulates in the flue with every fire. Once the buildup exceeds about a quarter inch, the chimney is at risk of a chimney fire — combustion within the flue itself, which can reach 2,000°F and crack the flue liner, ignite the framing around the chimney chase, or jet flames out the top of the chimney onto the roof. Chimney fires total houses. Annual sweep cost is $200-$400 and includes a Level 1 visual inspection. If you burn frequently or burn anything other than well-seasoned hardwood, sweep more often.
Inspect the chimney cap and flashing. A missing or damaged chimney cap lets water and animals into the flue. Damaged flashing where the chimney meets the roof is a common interior leak source. Both should be addressed in fall while a roofer is still easy to schedule.
Test the damper. Open and close the damper. It should operate smoothly and seal tightly when closed. A stuck-open damper is a giant heat leak; a stuck-closed damper means a smoke-filled house the next time you light a fire. Replace or repair as needed.
Stock seasoned firewood properly. Firewood needs to be split, stacked, and seasoned for at least six months — ideally a full year — before burning. Burning unseasoned wood produces dramatically more creosote and is the leading cause of chimney fires in residential settings. If you are buying wood, ask explicitly for seasoned wood and verify with a moisture meter (under 20% is the target). Stack off the ground, covered on top but open on the sides, in a sunny windy location.
Inspect gas fireplace components if applicable. Gas log sets, direct-vent inserts, and gas fireplaces should be serviced annually — pilot light, thermocouple, gas valve, vent integrity. Cost is $100-$200 and is genuinely worth it. A failed direct-vent seal is a CO risk identical to a cracked furnace heat exchanger.
Skipping this section costs: Chimney fire (full structural loss potential, $200,000-$500,000+), CO leak from gas appliance ($50,000+ medical risk), failed flashing leak ($3,000-$15,000 in interior damage).
Safety Systems: Detectors, Generators, Emergency Prep
Winter is when home safety systems are most important and most often neglected. This is also where homeowners most reliably overspend on the visible items (generators, snow blowers) and underspend on the items that actually save lives (detectors, batteries, insulation).
Test every smoke and CO detector. Replace batteries on every battery-powered unit. Replace any detector over seven years old. This is non-negotiable. Detectors degrade. A detector older than the manufacturer’s stated lifespan is unreliable, period. Battery replacement happens every fall on the same day you change the clocks for daylight saving. Detector unit replacement happens whenever the unit hits its lifespan.
Inventory and inspect fire extinguishers. A typical home should have at least one ABC-rated dry chemical extinguisher in the kitchen and one in the garage or workshop. Check the gauge — needle in the green band means good, needle elsewhere means the unit needs servicing or replacement. Extinguishers have date codes; six to twelve years is the typical service life depending on type.
Generator: prep or skip. If you live somewhere that loses power during winter storms, a portable generator is genuinely useful — but only if you have prepped it correctly. Pull last year’s stale fuel out of the tank (or use fuel stabilizer in fall and run the generator monthly to keep fuel circulating). Test-start it in October to confirm it runs. Verify your transfer switch or interlock kit is in working order — backfeeding a generator into the house through a regular outlet is a fire and electrocution hazard, and it can kill utility workers restoring power. Stock fuel safely (in approved containers, in a detached garage or shed, not in the living space). Our best portable generators roundup covers the runtime-tested homeowner-grade units. Match generator size to actual loads — a 5,000-watt unit handles a furnace, fridge, lights, and a few outlets, which is what most homeowners actually need. A 12,000-watt unit is overkill for most situations and costs three times as much in fuel during a long outage.
Snow removal equipment ready by Halloween. Service the snow blower (oil change, fresh fuel with stabilizer, paddle/shoe inspection on single-stage units, auger shear pin check on two-stage units). For homeowners deciding between a snow blower and shoveling, our best snow blowers guide covers the sizing logic — single-stage for short flat driveways with under 8 inches of typical snowfall, two-stage for longer driveways or 8-18 inch storms, three-stage for driveways with end-of-driveway plow piles or 18+ inch storms. Stock a plastic snow shovel for porches and decks (plastic does not damage wood), a metal shovel for ice chipping, ice melt scaled to your driveway and walkway area, and a roof rake if you live somewhere with heavy snowfall and lower-pitched roofs.
Stock the cold-weather emergency kit. Flashlights with fresh batteries (one per family member, plus one in the car), candles and matches, a battery-powered or hand-crank radio for weather alerts, a 72-hour supply of nonperishable food and water for everyone in the household, blankets and warm clothing, a corded landline phone or a cell phone in a charged power bank if your only phone is cordless and depends on house power, and any prescription medications. Cars should have winter kits too: blanket, snacks, water, extra clothes, jumper cables or jump pack, first aid kit, sand or kitty litter for traction.
Vehicle and outdoor equipment storage. Battery tender on any seasonal vehicle (motorcycle, lawn tractor, boat). Fuel stabilizer in any small engine that will sit through winter. Lawn mower drained of fuel or fueled with stabilizer (our best lawn mowers guide covers cordless options that sidestep small-engine winterization entirely — battery storage at 50% charge in a temperate location and you are done). Pressure washer drained of water (any residual freezing inside a pump cracks the pump head, which is a $200-$500 replacement) — see our best pressure washers for home use roundup for models with proper drain procedures.
Skipping this section costs: Generator fails when needed ($200-$1,000 in spoiled food, hotel, plus equipment replacement), CO poisoning from failed detector (medical event), house fire from chimney or unmaintained equipment (catastrophic).
DIY vs. Call a Pro: Quick Reference
The right division of labor depends on the cost-of-failure for each task, not on which is cheaper to delegate.
DIY confidently — failure costs nothing meaningful:
- Outdoor hose disconnection and storage
- Foam pipe sleeves on accessible plumbing runs
- Furnace filter changes
- Detector battery replacement and testing
- Ceiling fan reversal
- Weather stripping replacement
- Gutter cleaning on single-story homes with a stable ladder
- Snow blower routine maintenance (oil, fuel stabilizer, paddle/shoe wear check)
- Caulking exterior penetrations
- Closing crawl space vents
DIY situationally — depends on your experience:
- Gutter cleaning on two-story or steep-pitched roofs (rope access and harness recommended; otherwise hire it)
- Attic air sealing (DIY-able with research and proper materials, but a pro with thermal imaging finds leaks you will miss)
- Storm window installation
- Sprinkler shutoff manual valve closure (DIY) but blowout (pro)
- Wood stove door gasket replacement
- Heat trace cable installation (DIY on accessible runs; pro on complex or hard-to-reach routing)
Always pro — failure costs are unacceptable:
- HVAC annual tune-up and combustion analysis
- Cracked heat exchanger inspection
- Chimney sweeping and Level 1 inspection
- Sprinkler system blowout (proper PSI control matters)
- Roof repair work (fall hazards plus shingle work expertise)
- Crawl space encapsulation
- Gas line work of any kind
- Electrical work on heat trace circuits or generator transfer switches
- Ice dam removal on steep or two-story roofs (steam removal by a pro, not heat cables or hammers)
The financial logic: pay $150-$300 for an HVAC tune-up to avoid a $50,000 medical event from missed CO leak. Pay $200-$400 for a chimney sweep to avoid a chimney fire that totals the house. Pay $75-$200 for sprinkler blowout to avoid $300-$1,200 in spring sprinkler repairs. The math always favors paying the pro for high-failure-cost tasks.
Final Walk-Through Checklist
The day before you consider winterization done, walk the property with this list. If any item is unchecked, fix it before the first hard freeze.
Exterior:
- Every outdoor hose disconnected, drained, stored indoors
- Every non-frost-free spigot shut off at interior valve and drained
- Sprinkler system shut off and blown out
- Gutters clean, downspouts flowing, no sagging or loose hangers
- Roof inspected (binoculars from ground, or pro inspection)
- Tree limbs over roof and service drop trimmed
- Outbuilding water supplies isolated and drained
Plumbing:
- All vulnerable pipes identified and insulated
- Heat trace cable energized on chronically vulnerable lines
- Crawl space vents closed
- Crawl space plumbing insulated
- Main water shutoff confirmed working
HVAC:
- Professional tune-up complete
- Filter replaced; six spares in stock
- System tested with sustained run
- Ceiling fans reversed to clockwise
- Thermostat programmed for winter schedule
- Backup heat source (wood stove, propane heater, electric baseboard) tested
Building envelope:
- Attic air sealed at all penetrations
- Attic insulation at R-49 minimum (or zone-appropriate target)
- All exterior door weather stripping good; door sweeps replaced if compressed
- All exterior penetrations re-caulked
- Storm windows or shrink film on single-pane windows in worst rooms
- Crawl space addressed (encapsulated or floor heavily insulated)
Fireplace and chimney:
- Chimney swept and inspected (annual)
- Chimney cap and flashing inspected
- Damper tested
- Seasoned firewood stocked
- Gas appliance fireplaces serviced
Safety:
- Every smoke detector tested; batteries replaced; units under 7 years old
- Every CO detector tested; batteries replaced; units within service life
- Fire extinguishers in green band; in kitchen, garage, and any workshop
- Generator tested; fuel stabilized; transfer switch verified
- Snow removal equipment serviced and ready
- Cold-weather emergency kit stocked
- Cars carry winter kits
Vehicles and equipment:
- All seasonal vehicles on battery tenders
- All small engines drained of fuel or fueled with stabilizer
- Pressure washer drained
- Lawn mower stored properly (battery at 50% if cordless)
If every box is checked, your house is genuinely winter-ready. The recurring annual list shrinks every year if you also chip away at the one-time improvements (attic air sealing, frost-free spigot upgrades, crawl space encapsulation, smart thermostat, heat trace on chronic lines), and after about three to five winters of doing it right, fall winterization becomes a half-day task instead of a month-long ordeal.
The homes that have winter problems are not the ones that got hit by bad luck — they are the ones that skipped steps on this checklist. The homes that sail through winter without callbacks are the ones whose owners worked through this list deliberately, made the one-time investments where they had the highest payback, and treated the recurring annual tasks as non-negotiable instead of optional. Spend the weekend in October. The math works out every time.
Frequently Asked Questions
What temperature causes pipes to freeze?
Do you leave faucets dripping when winterizing?
Is it okay to leave a house unheated in winter?
What's the single most important winterization task?
How much does it cost to winterize a house professionally?
Related Articles
7 Best Pressure Washers for Home Use in 2026
outdoor-power
7 Best Air Purifiers for Home in 2026
home-air-filtration
Spring Home Maintenance Checklist: A Contractor's Priority-Order Guide
outdoor-garden
7 Best Cordless Leaf Blowers of 2026
outdoor-power
7 Best Portable Generators of 2026
power-tools-workshop
About the Reviewer

Jake Morrison, Licensed General Contractor
B.S. Construction Management, Purdue University
Jake Morrison has spent 14 years in residential construction and home renovation before founding DIYRated in 2026. After helping hundreds of homeowners choose the right tools and materials for their projects, he started writing the product guides he wished existed when he was starting out. Jake tests every major product recommendation in his workshop in Indianapolis and focuses on real-world performance over spec-sheet marketing.